Outdoor & Alpine Gear: Self-made or Improved

     Top         

Gear - Selfmade or Improved

Here are some of my ideas for improving or improvising Outdoor Equipment for 
special purposes, that should be in some form better than what you would regularly use:


Solo-Climbing Tool: Modified GriGri

more gear ... 

NOTE: Warning ! This is NOT a recommendation. Whatever you do is at your own risk !

Solo Climbing in General

The topic of solo climbing as such and it's Pro's & Con's of having a 'live' partner instead 
is nothing I want to discuss here. This article is meant for people who know what they are 
doing and why. Here is a good link to learn more about all this if you are just interested:
TradGirl.com Solo Leading

The GriGri Modification

The GriGri to soloist modification is about turning your standard Petzl GriGri into a decive
that allows you to climb solo while leading on a rope. (Versus ascenders which require a
toprope set up, which makes it useless for multi-pitch climbs) Note, that Petzl will of course
strictly claim that their GriGri is not intended to be used like that. The modification will void 
their warranty.

The modification is nothing I invented, and I don't know who was the first who had the idea.
I found the discussions around this soloing device on many newsgroups - you can read the 
discussions on Google yourself and form your own opinion:  Google discussions :
http://groups.google.com/groups?q=grigri+soloist&hl=en

What I want with this page is to provide you with my personal experience in building and use of
this tool, that could help you if you have decided to build such a device. There was already a
page on that on the web, that I used for my start, but I have some slight enhancements to that 
and some better pictures that give you more hints on what to do. You can read the original 
page by Nathanial Beckwith (now broken link so here is a local copy) to get an intro.

The basic idea is to use the GriGri in a way that ensures it locks when the rope
comes from above, while allowing the rope to pass through freely when it comes
from below. (In case of a fall, you would drop past the last protection, which means
the rope comes from above.) You will have to climb as a leader like with a normal
belayer, then fix the top of the rope to the next belay station when you reach it,
descend on the rope and climb the pitch again.

There are some commercial tools made explicitly for this purpose by a company that 
specialized on soloing devices : http://www.wrenindustries.com/  
The modified GriGri compares best to their 'soloist'. 

Reasons why one would still consider using a homemade tool instead are:

Plus: 

Minus: 

 Pictures, Step by Step:  (Click on thumbnail for bigger image.)

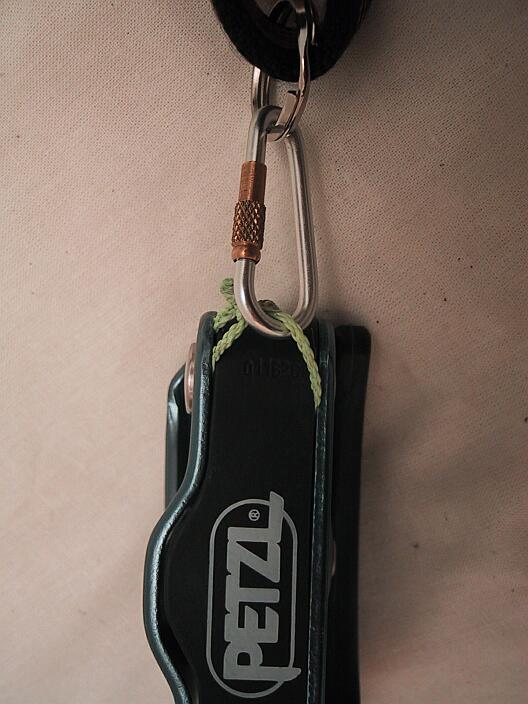
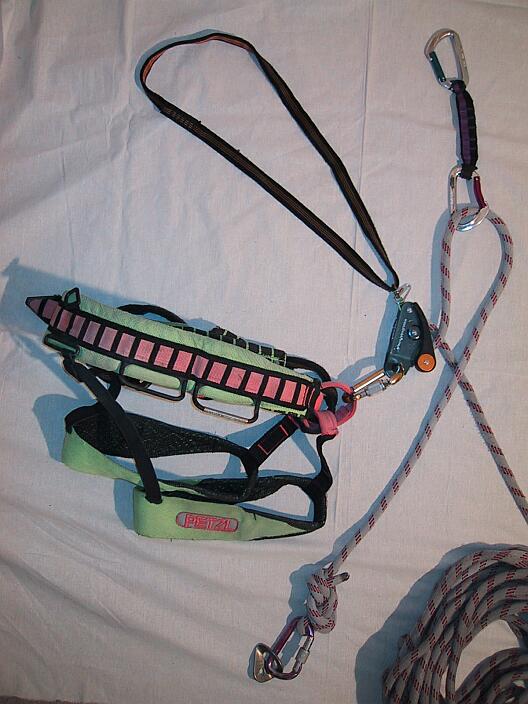
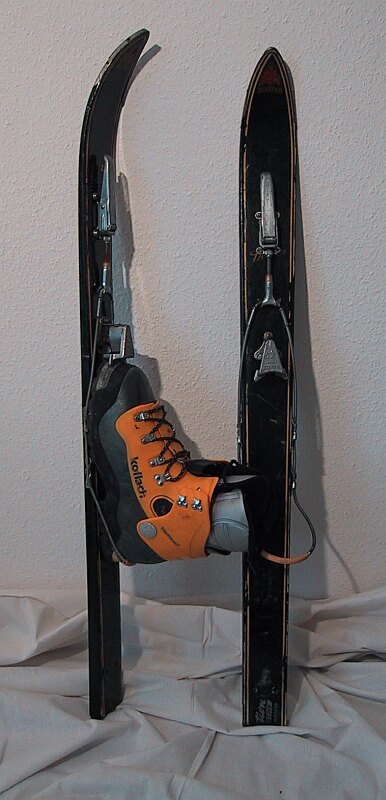
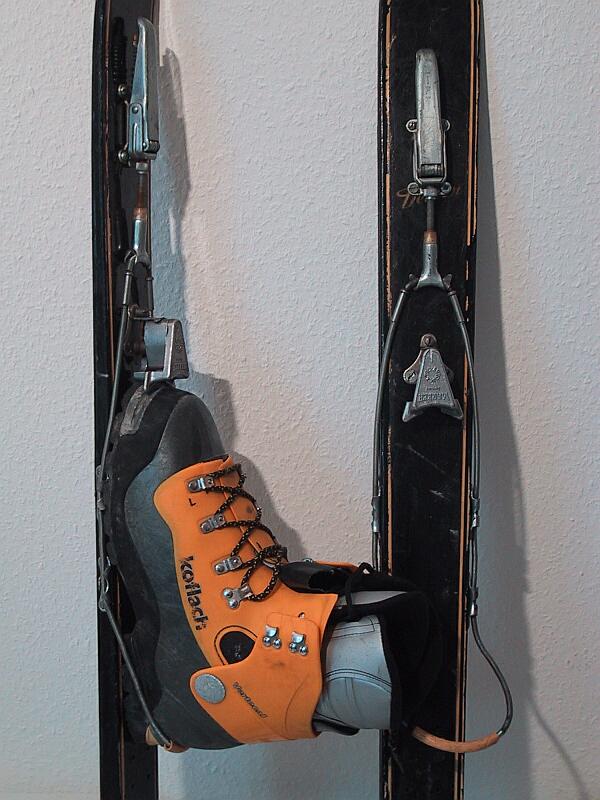
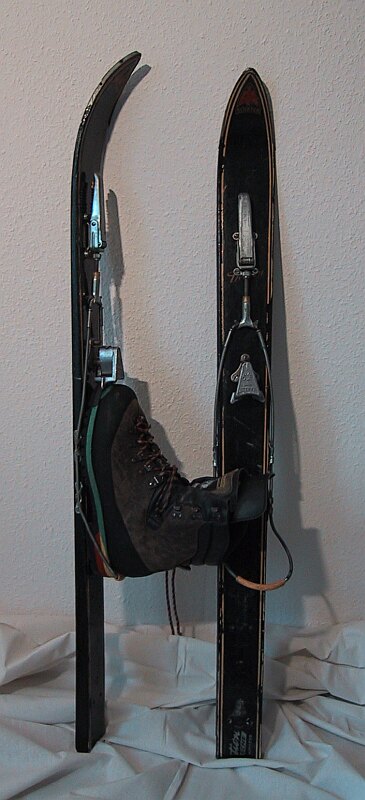
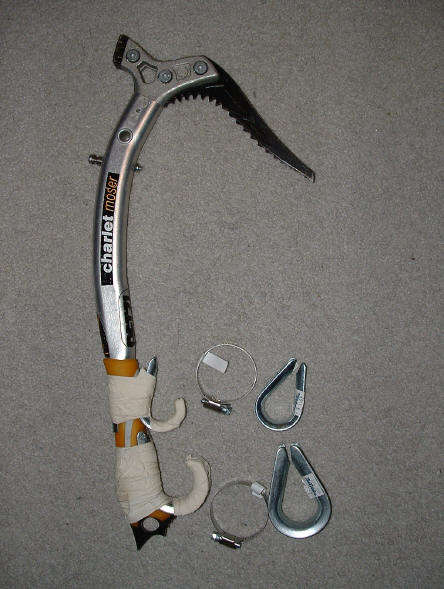
Step1: Upper Attchment
This is already the first difference from Nathanials Design.
I didn't drill a hole, but simply used a thin but strong nylon string and looped it around the axle that holds the two halves together. This is already sufficient, but it can be enhanced a bit more by threading another string through the other side between plastic and metal (loosen srew for that) The  benefit compared to drilling a hole in the side is that the point where you pull is higher up on the GriGri, which allows it to position better.

step1-upper-attachment.jpg (48556 bytes)

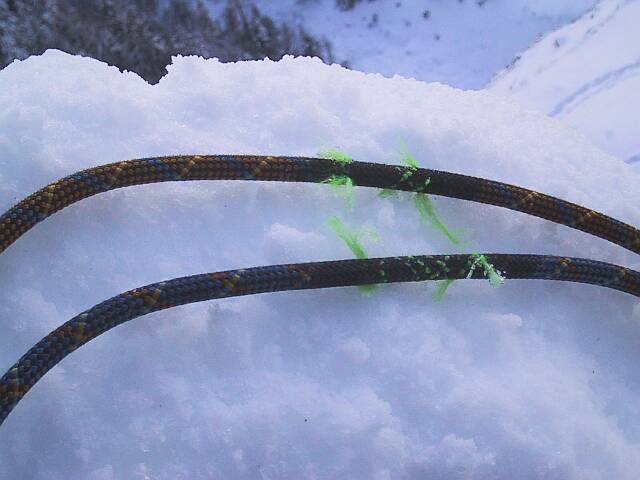
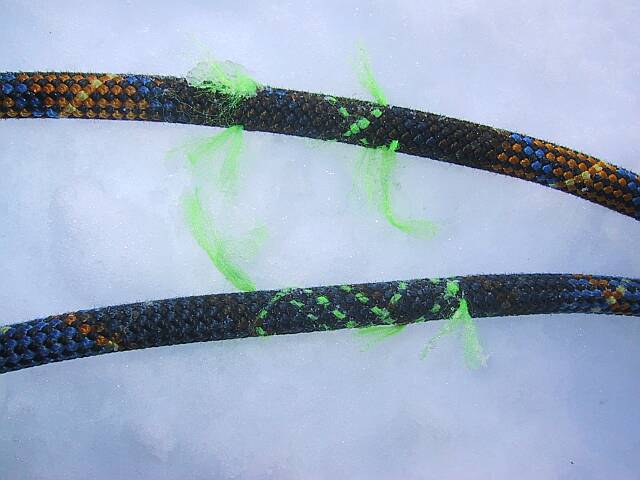
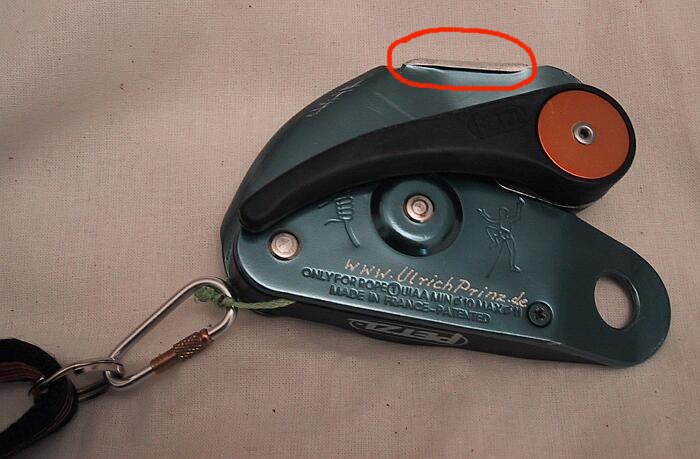
Step2: Modify the 'Flap'
This step is not really necessary for the first tries. It only smoothens the feed. If you are uncertain if you want to use a solo-tool often, try it without this modification first. But don't worry: Sawing it off does not impact the regular use for belaying, actually it improves the handling: You can hold the grigri down and simply pull the rope upwards. The Flap is the part you can see in the red circle on the photo.
Step 2 Saw off Flap  (51503 bytes)


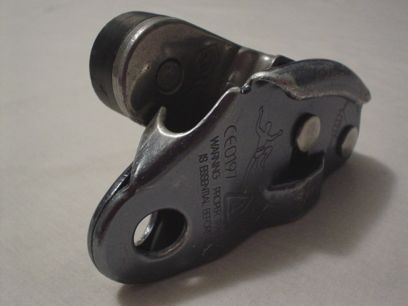
After using my solo-grigri for some time, I found a warning on Nathanials page added the in 1999 where he recommends not to use the device any more. The problem with sawing off the flap is, that this theoretically allows the rope to slip under the handle in a fall and then the rope would be stopped by the relatively sharp edge of 
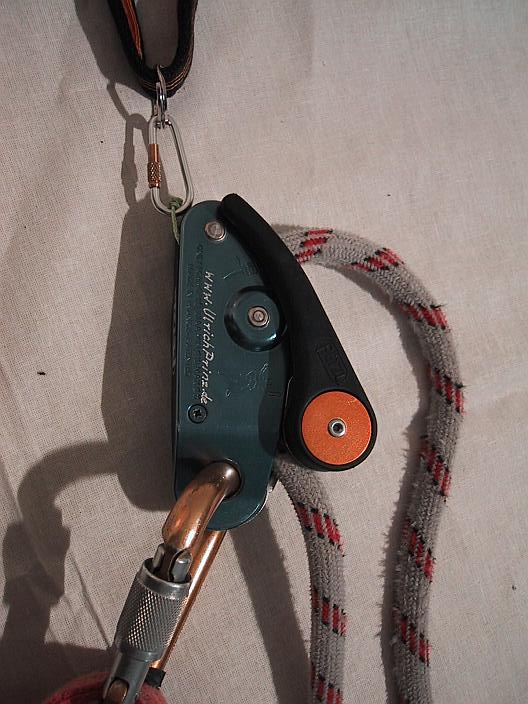
the handle, possibly cutting it.
To avoid this, I found a proposal on another good page, that just files the flap instead of cutting it off. I recommend to do this! The edges of the groove have been carefully smoothed down. The groove in which the rope runs does not extend below the actuating arm on the left so as to minimise the chance of the rope getting caught behind this arm which has quite a sharp edge.
As can be seen on the second picture the modification allows the rope to run though the GriGri in a much straighter line.
 

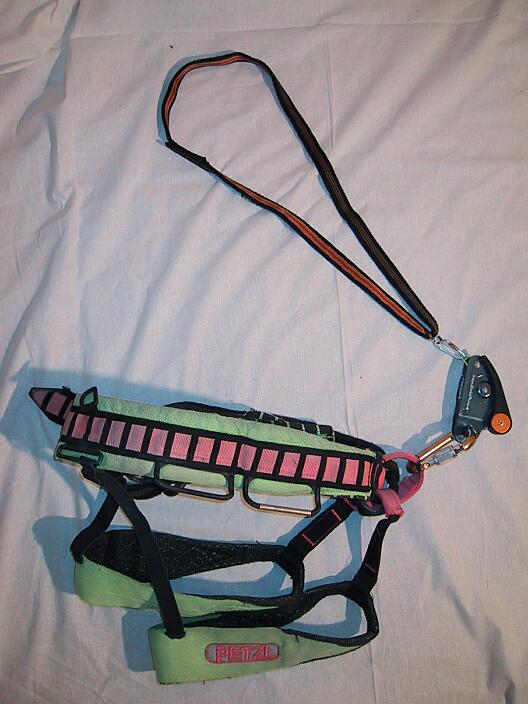
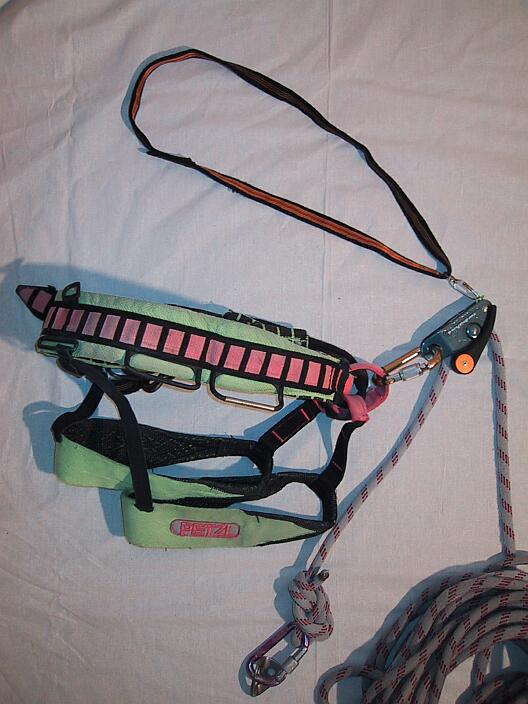
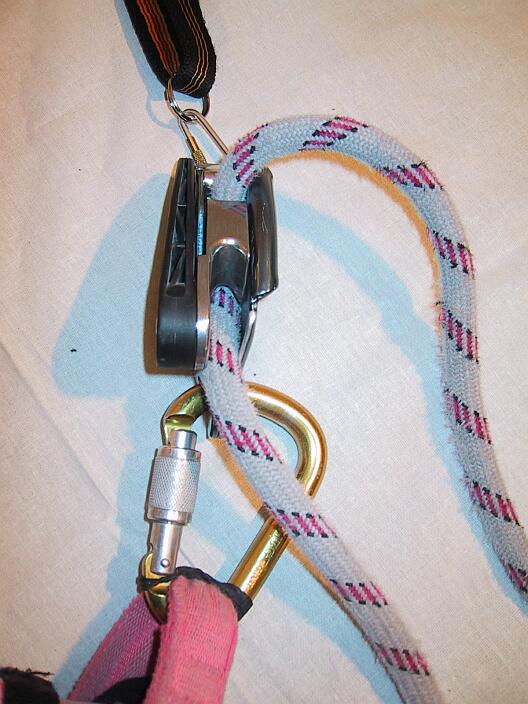
Step 3: Basic Rigging
Attach the GriGri as seen in a vertical position. Put a standard sling around your neck and clip it with any small biner to the little string you attached at top. The length of the sling can be adjusted by making knots into it, so that the GriGri ideally sits in a straight line between your head and the harness. (A little bit of slack is OK, and makes is a bit safer, see Tips below)
If this feels too uncomfortable, try a longer sling and put one arm through it along with your neck, so the sling runs diagonally in front of your chest.

step3-basic-rigging.jpg (52747 bytes)

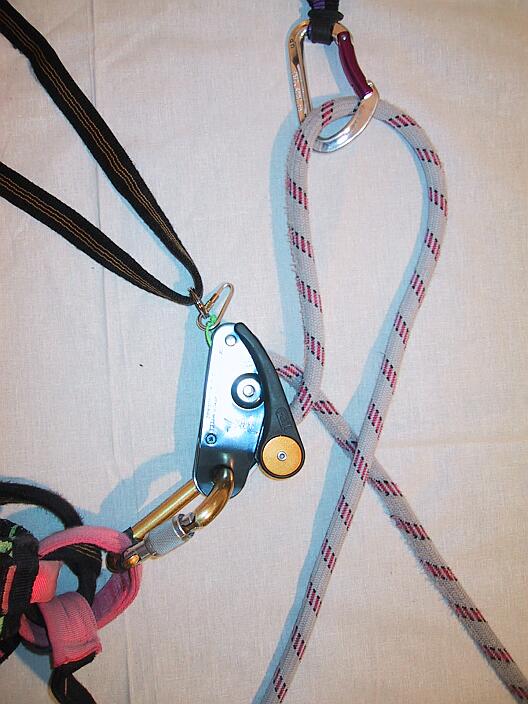
Step 4: Start Climbing
Now take your rope (regular 10-11mm, no statics of course) and fix it to your belay station with a locking biner. Make sure that it can be weighted in all directions, but especially the upwards direction is important. The rope enters the GriGri from the bottom and leaves it at the top, and then simply hangs down with the loose end. Make sure you have a (figure 8)  backup knot at the end of the rope, and ideally also a couple of them in between.

step4a-start-of-climb.jpg (56143 bytes)   step4b-view-from-side.jpg (61647 bytes)   step4b-view-from-front.jpg (59161 bytes)

Step 5: Clipping Pro
This step is a big possibility for making mistakes: When you come to clipping pro, make sure you clip the right end of the rope. The right end is the one coming out of the bottom of the GriGri ! This might look a little strange, while your waist is below the pro, but everything looks just fine when moving over it. -> Try this out a couple of times, until it becomes a habit.

step5a-clipping-pro.jpg (58597 bytes)   step5b-detail.jpg (58424 bytes)

Step 6: Reach the Belay,  Rapell, Reclimb
When you reach the next belay station, take out the GriGri (!) attach the loose end of the rope securely, and rappel down to the start again with your favorite method. Using your GriGri for that is just one alternative, but nice, because you can stop easily while cleaning the pro.
After removing your lower belay gear, you have to climb the second time, using an ascender (like the Petzl "Basic") or again your GriGri (manual feed necessary for Toproping!)  

Tips:

- for Step 4: Rope weight, loose end:
 The way it is described above works well at ground level, when the weight of the rope is still on the ground. As soon as you are 10m up or start the second pitch, the weight of the loose end of the rope is going to cause more and more friction making it uncomfortable to continue. This can be prevented by taking a 10 m loop of rope and attaching that to your harness before you climb. (Either with a knot,
putting it 'on slip' or using a small string as a prussik around the rope, see next Tip) This must be repeated as you go. 
- Rope weight, fixed end:
As you climb further away from your belay,  the weight of the fixed end of the rope will get heavier and heavier. At one point it can cause the rope to feed through the GriGri automatically, which gives you mucho slack in the system. This can be prevented by using the small string from the last tip and hanging the weight of the rope to a pro that you pass.
Both problems are the same with the soloing tools from Wrenindustries mentioned above. Please find more details on these 2 Tips there in the downloadable manuals, even with pictures.
- for Step 4: What to do if I start a climb at the ground, and there is no belay where I stand ?
This is simple: Rig everything as if you would fix it to a belay, then climb up to the first bolt where you can clip the locking biner there. Take a short rest there to check everything. Ideally, you should also clip the next bolt with a knot, so you have 2 pieces as a belay station.

- Force on Pro, the GriGri's static locking.
As you know the GriGri has a rather static locking behavior in case of a fall (meaning: there is no rope slipping when it locks) This can put very high forces on your pro. If you need to prevent this (e.g. Ice-Climbing) use a metal 'friction-plate' or 'shock-absorber'. Here are some examples.

Shock Absorbers Page

- WARNING: Possibility for failure: Upside-Down falls:
The modified GriGri won't stop you, when you pull it down with your head first in an Upside-Down fall.(Same as Wren-Soloist!)  There is 2 ways to react to this this: 

  1. Leave some slack in the sling around your neck, or attach it so lightly (e.g. Velcro or tiny string) that it will break loose in case of such a fall. As soon as the GriGri can orientate freely it will stop you. This is not a 100% solution, but it helps to reduce the chance.

  2. Make sure you always have (a) backup knot(s)  that stop the GriGri if everything else fails.

The best thing is, if you try yourself, how your setup reacts, by attaching the rope low on the ground and then start leaning backward as if you did that type of fall. You will see that this happens pretty late.

P.S.: No I am not sponsored by Petzl (or any other company)
I just noticed that most gear on the pictures is from them. Sorry, but I seem to like their stuff ;-) 

More Links

Finally my last Disclaimer: 
As Nathanial said:  If you don't understand something here, then you should probably not consider this modification. 

This is even more relevant for my page, because it seems like a 'foolproof' cooking recipe when you 
follow the steps above. Don't be a fool and be sure you know what you are doing with this.
Testing this without permanent modification at your local crag could make you certain  if this is 
meant for you or not. 


Ultra-light ( &Ultra-cheap) Sleeping Mattress

more gear ... 


At the office I had this nice idea for a cheap and ultra-light sleeping Mattress: 
Simply use one of these Air-Bubble packing foils as a sleeping Mattress.
The one I use has 15mm thickness, which is enough for most purposes.
You should sleep on the non-bubble side if you are on a flat surface.

Plus: 

Minus: 

 Some Pictures: (Click on thumbnail for bigger version.)

mattress-compare-with-battery2.jpg (51486 bytes)

mattress-compare-with-battery.jpg (59214 bytes)

mattress-simulated-with-finger.jpg (25810 bytes)

Compared to AA-Battery Compared to AA-Battery Simulation with finger


Short (Approach) Skis

more gear ... 


Because I hated to carry my heavy full-size skis on my back while climbing steep North-Faces,
I looked for alternatives.  The most ideal ski for that is probably the Rossignol 'Freetrek Venture'
(now sold as STC) which I have bought in the meantime. But they are still heavy and expensive (see at link)

Here is my intermediate solution, that I have tested for one day only  -  I was far from happy with the results:

Plus: 

Minus: 

 Some Pictures: (Click on thumbnail for bigger version.)

shortski_all_plasticboot_800.jpg (70303 bytes)

Detail: Binding & Shoe(74892 bytes)

Shortski with Leather Boot (63392 bytes)

ShortSki with 
standard Plastic mountaineering Boot
Detail: Binding & Shoe with 
Leather Shoe


Leashless Ice-Tools improvised

more gear ... 


Here is a great idea from a friend, John Scoles for waterfall climbing:
He used the parts that are usually put at the end of Metal cables to form a hole to
form a 'trigger' (that's what these parts are called on the Grivel tools). With two of
these you should be able to make your leash obsolete and climb more freely like
with all those new bent toys (Ergo, ...)

Check the picture on the right for details.
The German word for the little metal part is "Kausche" (see google for Kauschen)
you can usually buy it at your local Hardware store (Baumarkt) or at a sailing shop.
Needless to say that you can remove them in spring for alpine climbing...


Marking the middle of the rope(German)   

more gear ... 


Immer mal wieder gehe ich mit neuen Leuten Alpin klettern und benutze dann ein fremdes Seil zum abseilen, das keine Markierung der Seilmitte hat. Jedesmal finde ich das ziemlich stressig, denn man muss entweder grob abschaetzen wo die Mitte ist (geht meist schief), oder es penibel gleichzeitig ausgeben, wenn man nicht gerade das Glueck hat, das die Seilenden frei nach unten durchhaengen, und man es sehen kann. 

Weil das andere Leute aehnlich stresst, kommt in der Newsgroup oefter die Frage auf, wie man denn am besten die Seilmitte markiert. Hier habe ich mal die verschiedenen Moeglichkeiten aufgelistet:

1) Wechselfarbig gewebte Seile
2) Wasserfester Stift / Farbe
3) Klebestreifen
4) Selbst eingewebte Fäden   (Tip! Pic)


1.) Wechselfarbig gewebte Seile

sind (fast) ideal – aber teuer. Meiner Meinung nach zu teuer,: Wenn man viel klettert, denn dann verschleisst das Seil einfach zu schnell als dass sich der Aufpreis jedes mal lohnt.

Das fast kommt daher, daß ich schon sehr viele Seile gesehen habe, bei denen  ein Ende durch Steinschlag etc. so gelitten hat, daß man es abschneiden mußte. Dann fehlen z.B. einseitig 5m und die Mittenmarkierung ist einfach um 2.5m falsch. Es ist ziemlich dumm, wenn man dann unten merkt, das es nicht langt … Der Besitzer weiß vielleicht noch, welche Seite man beim Abseilen verschoben haben muß, aber oft fädelt halt der Partner durch, und weiß das nicht.

=> Fazit: Gut & Teuer

2.) Wasserfester Stift / Farbe 

Das Thema: „Verträgt mein Seil (chemisch) auch wasserfesten Stift?“ will ich hier nicht noch mal komplett aufrollen, dazu haben sich schon zu viele die Finger wundgeschrieben. Nur soviel: Kein Tester und kein Privater hat bisher irgend etwas veröffentlicht, das diesbezüglich wirklich Negatives gefunden wurde. Das Einlegen eines Seiles in Benzin hat nach Pit Schubert z.B. keinen Einfluß auf die Reißfestigkeit des Seils.

Aufgetragene Farbe verbleicht sehr schnell. Ich habe verschiedenes ausprobiert, aber durch Nässe beim Eisklettern, häufiges Abseilen, schleifen bei Grattouren … Arbeitet sich die Farbe schnell ab. (-> Nachfärben) Außerdem sieht man das nur gut auf wirklich hellen Seilen sonst fehlt der Kontrast.

=> Fazit: Gut aber nicht gut genug.

3.) Klebestreifen

sind meiner Meinung unbrauchbar ! Das Ganze mag eine Weile gut gehen, aber irgendwann wird das Ding sich genau in dem ungeschicktesten Moment in einer Prusikschlinge (Das Teil, was viele beim Abseilen zur Sicherheit ueber ihren Abseilachter haengen)  oder sonstwo (z.B. Steigklemme beim aufsteigen, oder Solo-Training) verklemmen oder anderswie Ärger machen.  

=> Fazit: Unschoen

4.) Selbst eingewebte Fäden  (Tip!)

Nachdem ich all diese Moeglichkeiten fuer suboptimal befunden hatte, hab ich eine Weile ueberlegt, und eine Loesung gefunden:
Die Markierung soll deutlich sichtbar sein, aber nicht auf dem Seil stoeren. Da bleibt eigentlich nur eines: Eine Markierung, die
hauptsaechlich im Seil steckt: Eingewebte Fäden !

  • Alles was man braucht sind gut sichtbare und haltbare Fäden & eine Nadel. 
    Baumwolle und normales Nähmaterial taugt nichts. Nach meinen Tests blieb als ideales Material die Hüllfäden einer Reepschnur. Man nehme also eine solche mit grellgelben oder -roten oder sonstwie kontrastigen Fäden und eine Nadel mit mittlerer Öse. 
  • Von der Reepschnur schneidet man ein ca 30cm-Stück ab, macht den Kern raus, und kann dann auch leicht die benötigten Fäden rausziehen. Davon nimmt man je eine „Gruppe“ paralleler Fädchen von ca. 1 mm Dicke. 
  • Nun „webt“ man diese Fäden in die Mitte seines Seils, in Seilrichtung (ist viel besser sichtbar als rundrum) ca. 10 cm hin und dann wieder zurück. Man nimmt dazu einen bestimmten Rhythmus des Seils auf und läßt den Faden immer ein paarmal drüber, dann einmal unter den Hüllfäden des Seils durchlaufen. 
  • Das ganze ca. 5–6 mal rund ums Seil verteilen. Beim Abschneiden ca. 1 cm überstehen lassen, aber das stellt sich von alleine ein später. Diese Überstand franst dann aus und ist gut sichtbar, aber er stört nie beim Benutzen, egal was man damit tut. Im Notfall kann noch in der Dämmerung abseilen denn man kann das Gewebte und den Überstand auch ertasten.

Optimal wird das ganze in der Kombination mit einer Grundeinfärbung des Seils, z. B. 10 cm schwarze Farbe mit grellgelben Fäden darauf.

=> Fazit: Meine Empfehlung !

 Hier 2 Bilder dazu: (Click fuer groesseres Bild.)

rope-mid-1.jpg (37252 bytes) rope-mid-2.jpg (41113 bytes)

Overview

Detail

P.S.: Auch wenn man Halbseile benutzt, ist es sinnvoll, wenigstens bei einem davon die Mitte zu markieren.
        Oft genug muss man nur 20 oder 30 meter abseilen auf's naechste Band. Zu kurz, um extra beide 
        Seile zu benutzen, (besonders, wenn man sie schon aufgenommen hatte)  und zu lang, um einfach 
        mal grob beim durchziehen abzuschaetzen, dass es schon reichen wird.


Back to Ullis Main Page 


Template

more gear ... 


Gen....

Plus: 

Minus: 

 Some Pictures: (Click on thumbnail for bigger version.)